It was the very first time for me to grow potatoes and I am happy with the result. I got over 8kg from a 4m x 2m raised bed. I can imagine it could be even better if I add more mulch next time.
Here below the video how I have done it. I hope you like it.
...we have build a second worm farm... it is bigger than the first one and made from an old fridge which wasn't working anymore. We re-used old materials we had in our shed. The only part we bought for it was the tap to drain the worm juice :) Here the video how we have done it. I hope you like it.
What are you doing with too many bananas? You bake a banana bread or banana cake or even better, you bake a banana chocolate cake with no flour like this one :) Happy to share this recipe with you now as it was super delicious.
No Flour Banana Chocolate Cake Recipe
1/2 cup of olive oil (one cup is 250ml)
dash of vanila
2/3 cup of raw sugar, you can take less if your bananas are overripe and super sweet
3-5 very ripe or over ripe bananas(depends on the size), the skin can be dark brown already
4 Eggs
1 cup of grind almonds or almond meal
1 cup of desiccated coconut
2 tbs cacao
2 flat tsp baking powder
1/2 tsp baking soda
Preheat oven to 175°C
Whisk olive oil with vanilla and raw sugar.
Combine all dry ingredients in a separate bowl.
Add alternately eggs, smashed bananas and the combined dry ingredients gradually. Whisk until combined.
Bake for about 45-50 minutes until ready (toothpick test)
To make the the chocolate glaze, add into a small pot: 1 good tbs of butter + 1 tbs of cacao + 3 tbs raw sugar + dash of vanilla + 2 tbs water. Put on a medium heat and bring to boil while stirring. Ready is your glaze!
Tips:
I always buy whole almonds and grind them in a food processor. The taste/flavor is much better when you grind them just before use.
The baking time always depends on the tin/tray you bake the cake in but also on your oven. That is why I like to make the toothpick test when I think the cake might be ready. Open the oven, stick the toothpick into the cake. If it comes out with just few crumbles or dry, your cake is ready. If the toothpick has some wet batter on it, your cake needs more baking time.
Do you have any question? Just comment below or contact me via G+ or facebook
This is how my mum always used to make a fresh quark/cheese form a raw milk. She started with letting the milk on the kitchen bench for a couple of days until it turned into kefir and then she turned it into super soft and creamy quark. The recipe is very simple and the quark is delicious. I am using kefir I make form a pasteurized milk (as I have no access to raw milk) using the kefir grains or how some people call them the Tibetan mushroom. You could probably also use store bought kefir if you don't have the grains or try the old fashion way how my mum did it.
How To Make Quark Or Cheese From Kefir
You need:
kefir
cheesecloth
Pour kefir into a small pot and place it in a larger pot filled with water. The smaller pot needs to "sit" in the water.
Place it on a low heat for about one hour at around 45-50°C
Turn the heat off and leave it until the water cools down.
Place a double layer of cheesecloth over a sieve and place over a bowl. Strain the kefir.
Wait until most of the fluid goes through, grab all the ends of the cheesecloth and wrap it together or secure with a clip.
Depends on the room temperature and your liking, you can either hang the cheesecloth over the bowl and leave it in safe place or place your nearly ready cheese in the cheesecloth together with the strainer and the bowl in the fridge. Leave it there for few hours or over night until the cheese is ready. You can either gently push it through the cheesecloth to check but usually your quark/cheese is ready after about 5-6 hours.
Tips:
If your cheese taste too dry, just shorten the warming time. The longer you warm the cheese, the more dry may come out. It depends also on the type of the milk you use.
You can either drink the remaining fluid you collected in the bowl or give it to the animals if you have any. It is very healthy and it would be a wastage to throw it away. It taste better when its cold. Some people use it to make lemonade.
You can use cow milk, goat or sheep milk. Raw milk is always the best but it also works very well with the pasteurized milk you can buy in the local shops.
This was our last night side dish we made for dinner. I had a fresh Daikon radish which had to be harvested as the greens wanted to go to flowers already and this was the result! Super fresh and delicious salad! As usually it was a spontaneous idea so I just had to make a record of it. Now happy to share with you all.
Daikon Radish Salad With Ginger And Turmeric
1 Daikon radish together with some of the green top leaves
few green onions stalks, washed and cut into small pieces
1 tsp self made sweet chili souse (the recipe is in my blog) or fresh chili and raw sugar
2 garlic cloves, peeled and grated or cut into very small pieces
some fresh ginger and turmeric, peeled and grated
2-3 tbs vinegar
2-3 tbs olive oil
salt and pepper
Wash and peel the radish. Wash the leaves. We have taken few of the younger leaves. I usually pick the outer leaves for eating as well while the radish grows. They taste delicious on a sandwich!
Everyone knows that the worm juice is very good for all your greens in the garden. Here is a simple video of how we made a no cost worm farm made of recycled materials. You can sometimes get an old laundry tub for free or very cheap from your local recycling center or garage sale. The net can be any net, even an old insect net will do if it doesn't have any holes. if you don't have a strap, use a rubber band :) You could improve it further like install a pipe with a tap from the drain down to the bucket. We haven't done it as we already started to build a second, larger warm farm so this one won't be needed soon. If you want to see the larger one, also build from recycled materials, subscribe and stay tuned! Cheers :)
Here some info about what the worms like and what not:
Feeding Worms
Compost worms will consume all your house hold organic kitchen waste and yard trimmings, as well as all your old news papers and scrap paper, you can also put all your pet waste [pet poo] in you worm farm and the worms will eliminate this for you as well without any smell or pest problems.
What are the Requirements for compost worm feeding?
Compost worms will consume all your house hold organic kitchen waste and yard trimmings, as well as all your old news papers and scrap paper, you can also put all your pet waste [pet poo] in you worm farm and the worms will eliminate this for you as well without any smell or pest problems.
Worms like:
– Fruit peelings and vegetable scraps
– Tea bags
– Bread
– Rice
– Grass cuttings (after heating stage)
– Organic green yard waste (after heating stage)
– Animal manures (beware of worm medications)
– Scrap paper
– Newspapers
– Napkins
– Soil or sand – To help with their digestive systems and provides a source of decomposer bacteria.
If worms are not consuming a certain food, do not put in again.
Warning: If you are using animal manures, make sure that the animals have not been given any worm medication, as this will be fatal to your worms. We age all our animal manures for one month before feeding to our worm stock.
Worms don’t like:
– All fatty foods (The oil can suffocate the skin breathing worms.)
– Onions
– Garlic
– Chillies
– Capsicums
– Any spicy foods
– Dairy products (will make your worm farm smell)
– Citrus foods
– Meat (Will cause flies and maggots and make the bin smell)
It is very important to only feed enough food for a couple of days at a time, when there is only a small amount left re-feed the worm farm but in a different position in the worm farm. As your worm stock increase you can increase the amount of food that you are feeding.
Make sure that you keep an eye on the moisture levels in your worm farm, as some food has quite a lot of moisture. You might find that you will never need to add water if there is enough moisture in the food source.
Super yummy cheesecake for any occasion. It is very easy to make and it tastes just delicious! Super fluffy and refreshing summer taste. We had plenty of limes from our food forest and didn't want to waste them so that is how the recipe evolved. Try it and you won't regret it :)
Lemon Or Lime Cheesecake
Ingredients for the base:
150g bread crumbs
1 tbs raw sugar
1 tbs dessicated coconut
80g melted butter
Combine and press the mixture into the pan lined with baking paper. The loose-bottomed tart pan is best.
Preheat the oven to 160°C
Ingredients for the cheese cake:
500g cottage cheese (Coles or Woolworths are the best)
4 whole eggs plus 2 extra egg yolks (keep the egg whites for the topping)
125ml lime or lemon juice
finely grated rind of 1 lime or lemon
a dash of vanilla essence (optional)
Process the cottage cheese with a stick blender until smooth, then gradually add all the remaining ingredients until just combined. Pour over the base and bake for about 30 minutes (the cheesecake should still have a slight wobble) Remove from the oven and set aside to cool slightly for about 15 minutes. Use the time to make the topping:
Ingredients for the topping:
2 egg whites
1/2 cup raw sugar or caster sugar
1 cup desiccated coconut
Place the egg whites in a clean and dry bowl, whisk until soft peaks form. Gradually add sugar and beat till thick and glossy. Fold in the coconut gently.
Carefully spread meringue over the cooled cheesecake. Return to the hot oven and bake for further 10 minutes or until very light golden and firm to touch.
Remove from the oven, cool down a little until safe to touch and place in fridge for at least 4 hours before you cut it.
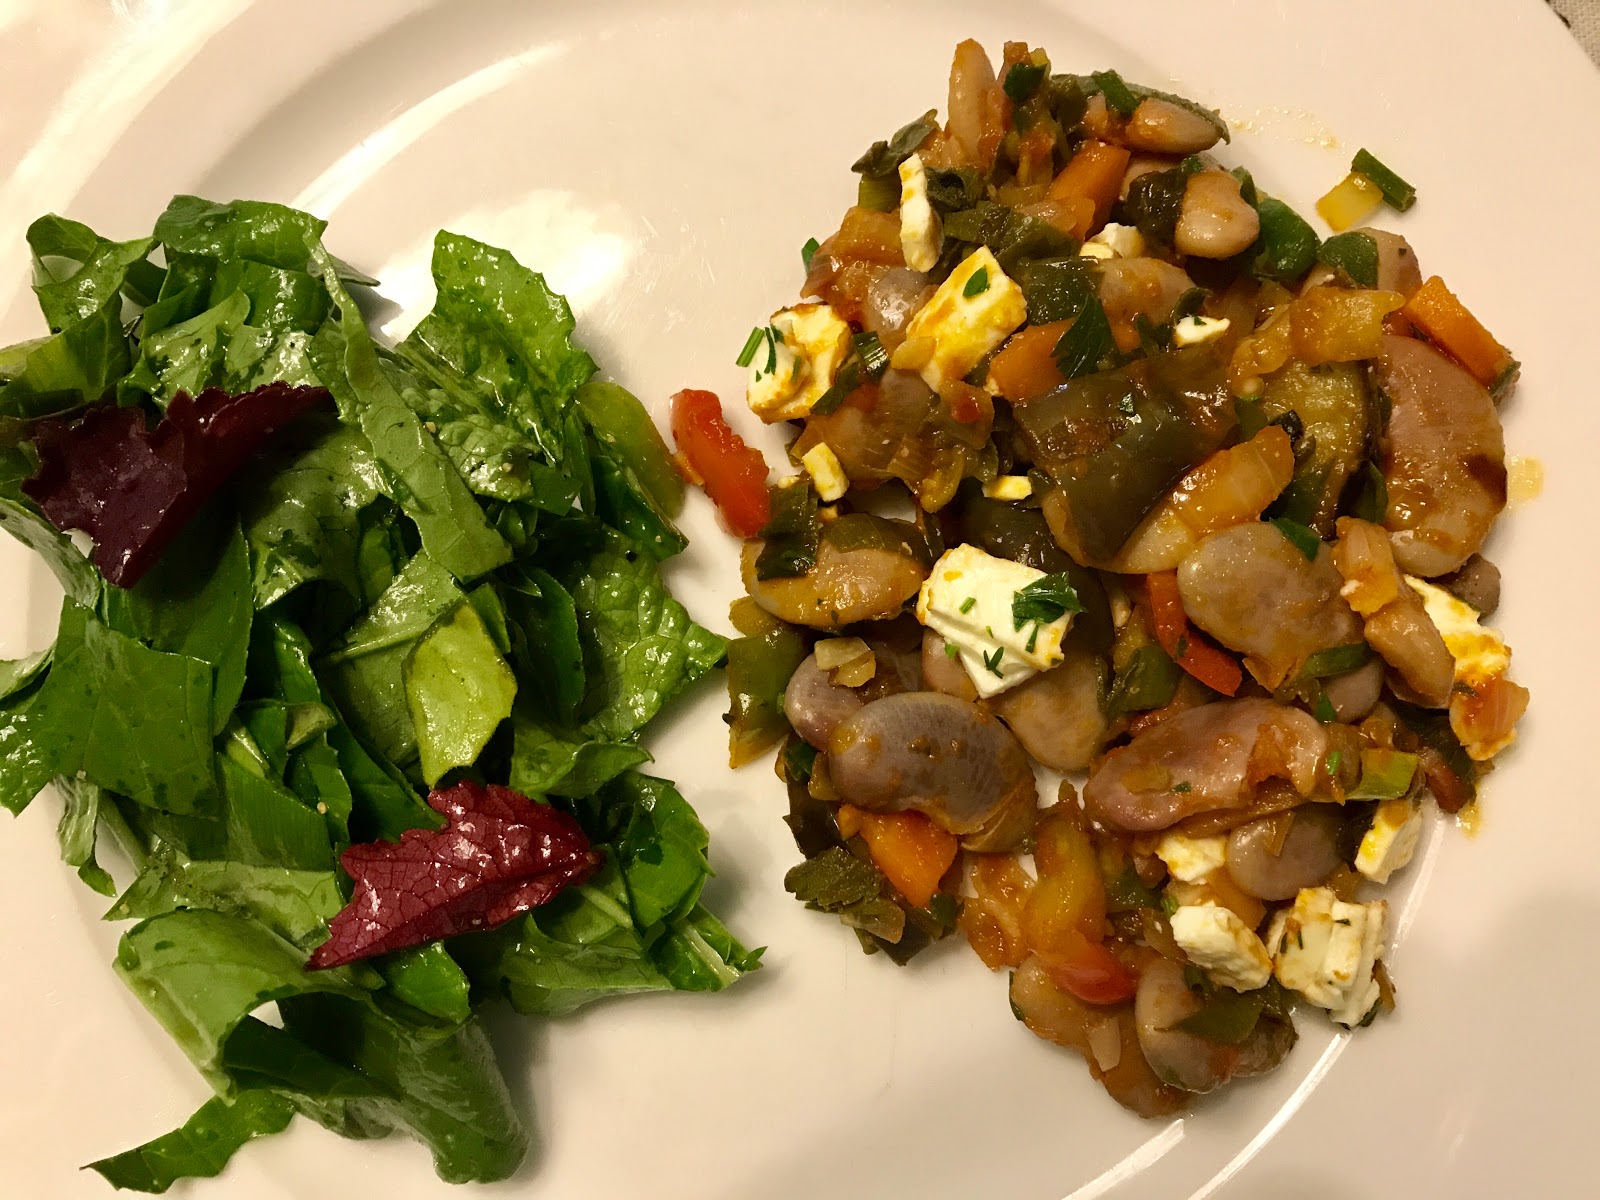
Madagascar bean is a perennial vine which grows up to 7 years in a warm climate. It not only grows very easily but the beans are also very tasty. If you want to see how the Madagascar bean grows in my garden, just click on the video below the recipe. It was the very first time for us to cook a meal with Madagascar bean and it was a big win so I am happy to share with you the recipe now.
Madagascar Bean With Feta and Veggies
Ingredients:
dried Madagascar beans, I took 12 large table spoons but this is to your liking
2-3 tbs smoked bacon chopped into fine strips
2 onions, finely chopped
2-3 garlic clove, finely chopped
fresh tomatoes peeled and finely chopped or tomato puree
1 carrot
1 capsicum
1-2 fresh and young eggplant
1 large or 2 small finely chopped celery stalks
some feta finely chopped
fresh or dried oregano and basil finely chopped
some flat leaf parsley
olive oil
sweet chili souse
soy souse
Soak the beans overnight in plenty of water as they will double in size. I have placed the pot in a fridge in the morning until I started to cook them late afternoon.
Drain and rinse. Cover with fresh water and cook until nearly soft. Drain and set aside.
Heat the olive oil in a large pan, add onion, garlic, bacon and eggplant and cook until soft. The onions should be light golden, not brown. Add remaining veggies, tomatoes and or tomato puree, herbs and simmer for about 3 minutes. Add the cooked beans, sweet chili souse and soy souse and stir through gently. Add Feta on top, put lid on and simmer on lowest heat for about 3-4 minutes. Garnish with some fresh parsley on top and ENJOY! :)
A quick video about the Madagascar Bean we grow in our food forest. It is a perennial bean and definitely worth growing if you live in a warm, subtropical or tropical climate. I could imagine they would also grow in a colder region as an annual.
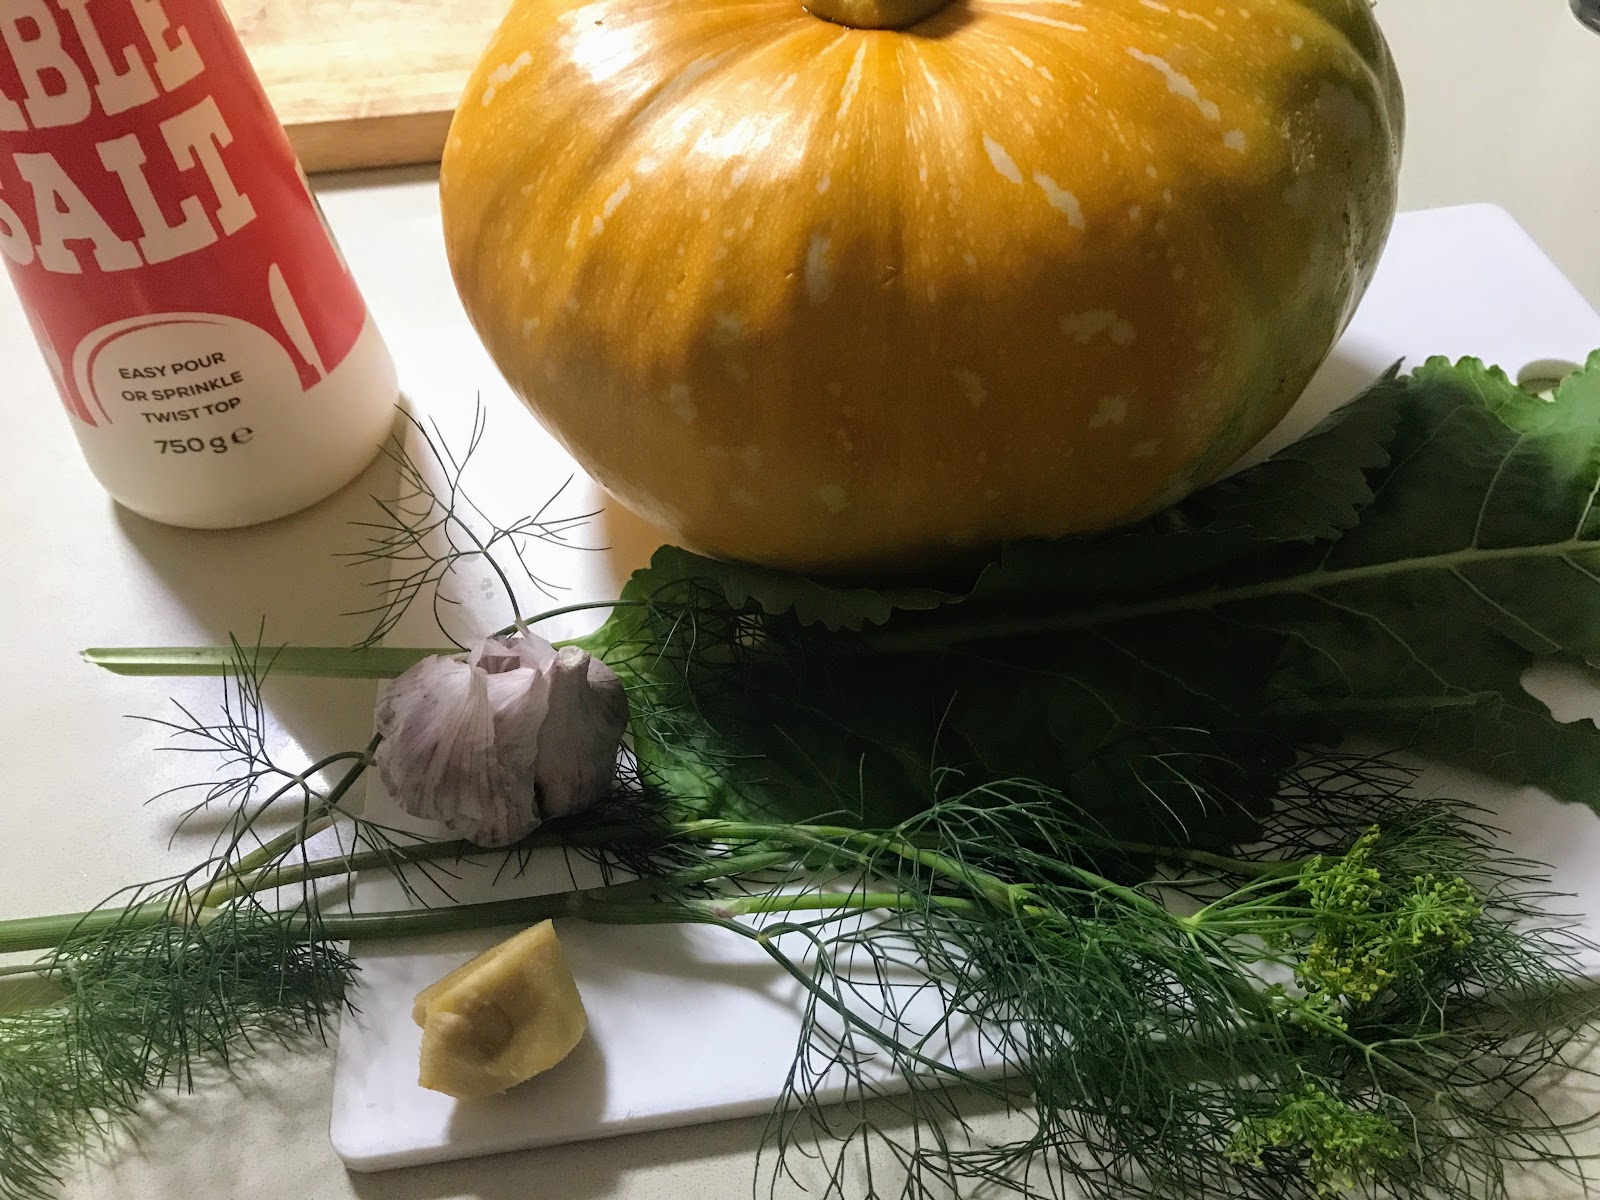
Our food forest is giving us plenty of pumpkins and I was looking for some different ways of preparing and eating pumpkin. I love fermented cucumbers which are very popular in Poland where I was born so I came to the idea to try the same with pumpkin and it is a big success!! That is why I want to share the recipe with you. While I am writing this post, we have already eaten the first two smaller glasses :) The texture is great, the taste lightly sour and little bit sweet. Just delicious! Try it yourself and let me know how did you go! Enjoy!
Fermented Pumpkin
"half-way" ripe pumpkin
water + salt: 1 large table spoon of salt per 1 liter of water. You might need more than 1 liter of water depends of how many jars you make.
You also need per one medium to large size of jar:
1 fresh, dried or frozen dill stalk
2-3 large fresh garlic cloves
1-2 cloves
4-5 black pepper seeds
1 horseradish leave (optional)
about 1cm length of fresh ginger (optional)
Boil water with salt. Let it cool down up to room temperature.
Clean the jars and lids! Wash in a dish detergent water, rinse and sterilize with fresh boiled water. It is very important to use super clean and sterilized jars!
Wash pumpkin, dill and horseradish leaves. Peel garlic cloves and ginger.
Wash and peel the pumpkin and cut into 2cm large cubes or 1cm x 4cm pencils. Keep some of the pumpkin skin.
Fill each jar very tight with one pumpkin peel, pumpkin cubes, together with garlic, dill, black pepper seeds, cloves, ginger and horseradish leave. The horseradish leave is optional. It is preventing your pumpkin of getting too mushy but I have also fermented cucumbers without the leaves in the past and it was good as well. Leave some room at the top.
Fill in the salt water. The pumpkin needs to be covered entirely but you still need to leave at least 2cm free room under the lid.
Close the lid and leave in a dark place in room temperature to ferment.
Depends on the room temperature, the pumpkin will be ready in about 7-14 days. Open one jar and try. It should have a nice sour-sweet taste and pleasant flavor.
Once ready, keep it in fridge for up to 3 months.
Tipps:
Pay attention to cleaning everything thoroughly! If you get some unhealthy mold under the lid or your fermented pumpkin goes off, it means that you either didn't clean it properly or you have overseen a faulty dot on your pumpkin
Place the glasses on a tray in case some water comes out of the jar during the fermenting process. It happens sometimes if you don't leave enough free room in the glass.
Here some photos of the whole process:
The photo below shows the glasses after 12 days of fermenting
The pumpkin has kept the beautiful yellow colour and it taste delicious.
Daikon Radish salad :) So easy and so yummy! Perfect with fish or meat or just with other veggies on the side. It is definitely one of my favorite vegetables :)
Just grate it, add Greek yogurt, salt and pepper and enjoy! Here a short video of how we prepare it. Hope you like it :)
It is super tasty and so simple to make. If you never tried a steak tartare, you should definitely have a try. If you like a nice and juicy steak from BBQ, you will love steak tartare, too!
Beef Steak Tartare
one nice piece of beef, topside is the best
onions, we take about two small to medium size onion for about 700g beef
2-3 egg yolks
soy sauce, salt and pepper
Mince or cut the beef into very small pieces. Add all other ingredients and combine. Taste and add some more spices if needed.
Keep in fridge. You should eat it all on the same day.
Here my video of how we do it :) I hope you like it.
It tastes and smells like home. This is my mum's recipe. It's easy and delicious with only few simple ingredients. Try and enjoy!
Mum's Apple Pie - Szarlotka
For the shortcrust pastry:
400g wholemeal
160g warm but not running butter
180g raw sugar
2-3 egg dots
2 tsp baking powder
5-6 tbsp milk
For the apple filling:
1kg apples
3-4 tbsp raw sugar (depends how sweet or sour are your apples)
some sultanas
pinch or two of cinnamon
some lemon juice
Combine all ingredients for the shortcrust pastry until you get a nice smooth dough. Wrap in a cling wrap and put into fridge for about 20-30 minutes. In the meantime prepare the filling. Grate the peeled and cored apples on large holes of box grater. Add sultanas, cinnamon, lemon juice and sugar. Mix through with a spoon or fork to combine
It is up to you but I always line the bottom of the spring-form pan with a baking paper. Roll out a good half of the pastry on a floured workbench then transfer and line out the bottom of your spring-form allowing excess to overhang up to at least half of the height of the pan. Transfer the apple mix. Roll out remaining pastry and cover the apples. Make few holes with a fork in the top pastry layer.
From our backyard straight to the kitchen. Just simple organic and healthy food. Delicious and quick. Everything done within 30 minutes if your guinea fowl you got was a young bird. This is my husband's Sebastian recipe and I am happy to share it with you.
Delicious And Quick Guinea Fowl Drums With Veggies
guinea fowl drums
onions
garlic
any veggies you like and/or got in your garden
turmeric, fresh is the best
salt, pepper
olive oil
few drops of soy souse
Prepare, wash and dry the meat. Cut onions and garlic and cook on medium to low heat in some olive oil together with the guinea fowl drums, salt, pepper, turmeric and soy souse, with a lid on until tender. Turn the drums couple of times in between. Take the lid off, add your veggies and cook without the lid for about 2-5 minutes depends what veggies you got. Don't overcook the veggies. They should be crunchy when you eat them. That's it! Enjoy!
I hope you enjoy my food forest tour today with many plant labels including scientific names to help you identify and remember the plants you are interested in. There are more plants I didn't mention so if you liked this video I will do a next one with the remaining ones. I will go into details about all these plants in my following videos. Enjoy!
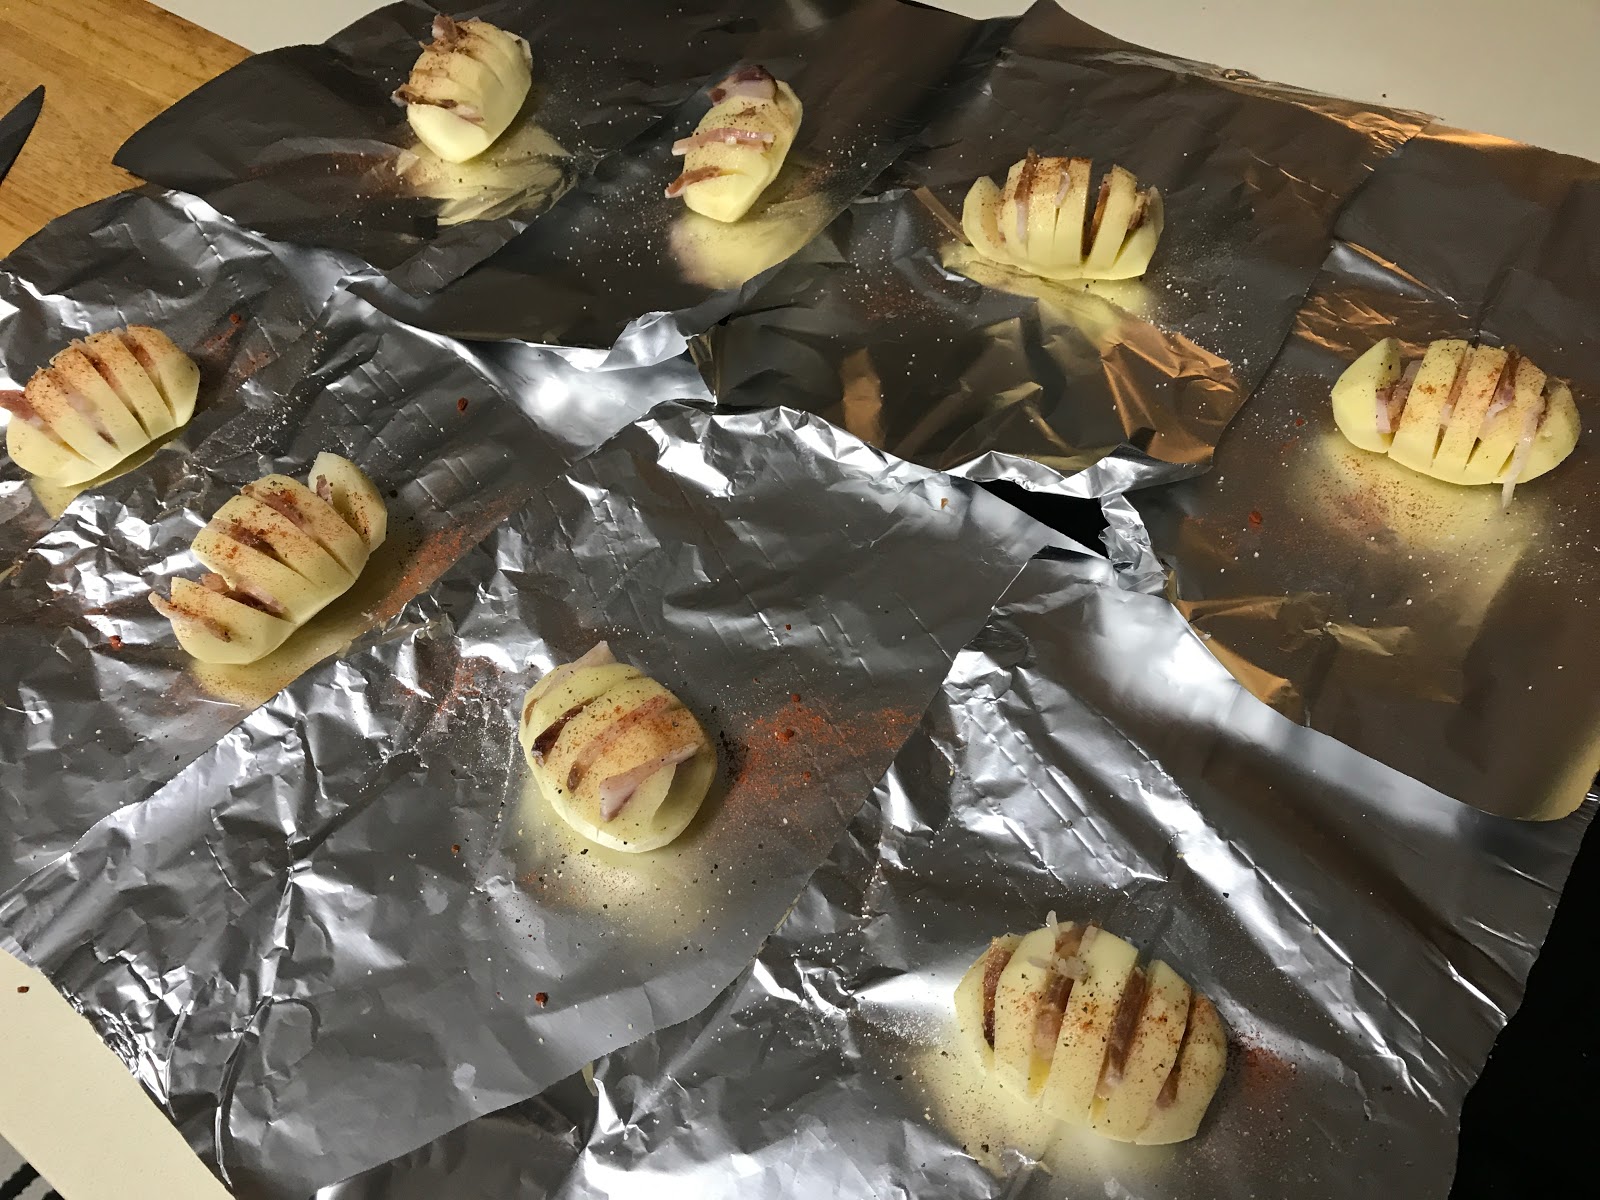
Very easy to make and super yummy. My mum used to make them when I was little. I love the taste of potatoes baked in an open camp fire with the little extra in between. The flavor from the bacon or speck makes this dish irresistible :) Try it out!
Country Potatoes Baked In Open Campfire
potatoes
bacon or speck, naturally smoked would the best
salt, pepper, paprika
olive oil
Cut the potatoes few times and up to about 2/3 of the total width. Stick the prepared bacon or speck into each cut and place on an aluminum foil. Spray or brush some olive oil on top and season to your liking. Close the foil bringing the edges to the top. Place either just next to the burning wood or into the hot ash if you got lots of it. Bake for about 10-20 minutes depends on the size of the potatoes. Check in between. They are ready when the fork goes easily in. Enjoy!
Options and tips:
You can also add some green onions into the potato.